This fourth article (in a series of 7 articles) reveals the technique used to render the Nano swivel.
Timeline:
- article 1: GNSP – the concept
- article 2: the 3D distance to a Nano S+
- article 3: the nano screen
- article 4: the swivel
- article 5: the background
- article 6: the video generation
- article 7: the final drop
- (?March) public mint
The collection is browsable on https://greweb.me/gnsp
OpenSea: https://opensea.io/collection/gnsp
This is very similar to the "nano screen" in that we will use a Canvas 2D as a texture to the GLSL shader and it will be projected on the swivel surface.
The Canvas 2D generative swivel code
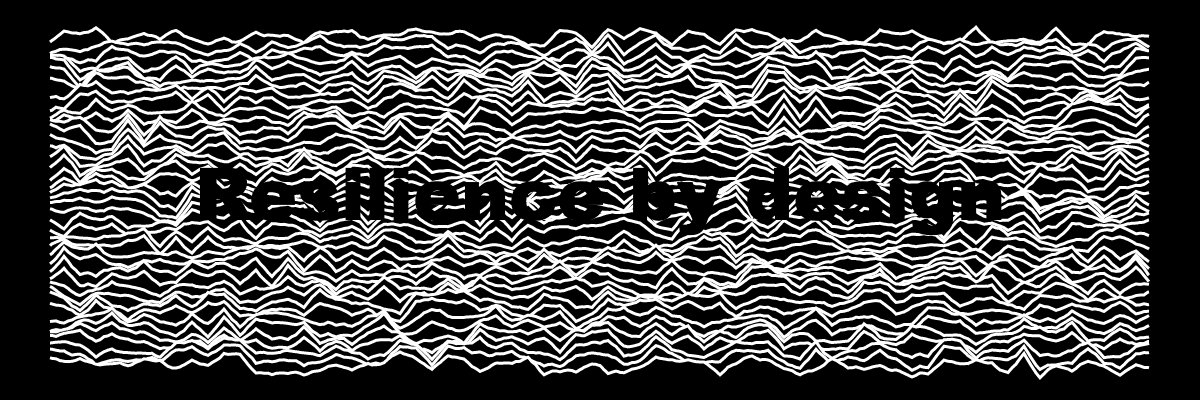
A canvas 2D of 1200 x 400 pixels is used to draw the swivel engraved texture. We use it to possibly display a text and draw some "plotted lines".
async function metal(word, swivelPlotted) {
  const w = 1200;
  const h = 400;
  const canvas = document.createElement("canvas");
  canvas.width = w;
  canvas.height = h;
  const ctx = canvas.getContext("2d");
  ctx.fillStyle = "#000";
  ctx.fillRect(0, 0, w, h);
  ctx.fillStyle = "#fff";
  let font = "Arial";
  // ...plot things...
  // ...draw text...
  return canvas;
}
Here is what the texture of #472 looks like:
and here is the final result in the raymarched object:
"plotted" lines
The swivel can sometimes be "laser plotted" which is a reference to the "plotting" work I've been doing last year. This "plotting" is a simple stacking of lines which create some mountains effect.
In the following code, swivelPlotted is defined when plotting is active and is an array of random values.
if (swivelPlotted) {
  ctx.strokeStyle = "#fff";
  ctx.lineWidth = 3;
  const octaveCount = Math.floor(3 + 6 * swivelPlotted[4]);
  const perlin = generatePerlinNoise(w, h, {
    octaveCount,
    amplitude: swivelPlotted[3],
    persistence: 0.2,
  });
  let pad = [50, 20];
  let amp = 120 * mix(swivelPlotted[0], swivelPlotted[1], swivelPlotted[2]);
  let incr = Math.floor(3 + 50 * swivelPlotted[1]);
  if (incr < 15 || (octaveCount < 4 && amp > 40)) {
    ctx.fillStyle = "#000";
    font = "Arial Black";
  }
  let heights = Array(w).fill(h);
  for (let y = h - pad[1]; y > pad[1] + amp; y -= incr) {
    ctx.beginPath();
    let up = true;
    for (let x = pad[0]; x < w - pad[0]; x++) {
      let dy = amp * perlin[y * w + x];
      let yy = y - dy;
      let m = heights[x];
      if (yy > m) {
        up = true;
        continue;
      }
      heights[x] = yy;
      if (up) {
        ctx.moveTo(x, yy);
        up = false;
      } else {
        ctx.lineTo(x, yy);
      }
    }
    ctx.stroke();
  }
}
text
As shown at the beginning, we can also simply have a text on the swivel. Sometimes it is combined with the plotting effect.
if (word) {
  ctx.textAlign = "center";
  ctx.textBaseline = "middle";
  const lines = word.split("\n");
  const sz = Math.floor(
    20 + 1200 / (3 + Math.max(...lines.map((l) => l.length)))
  );
  ctx.font = sz + "px " + font;
  lines.forEach((line, i) => // multi line
    ctx.fillText(
      line,
      w / 2,
      Math.round(h / 2 + 1.2 * sz * (i + 0.5 - lines.length / 2))
    )
  );
}
sticker text
We can also use emoji instead of text.
Raymarching shader integration
The swivel metal texture is rendered using a brownian noise. (like explained in https://thebookofshaders.com/13/)
Contextually to the raymarching, we have the local coordinate of the swivel (including its rotation), which allows us to do a texture lookup on the swivel text texture. All of this information (noise and texture) is encoded in the material value (a float). It is possible to encode it on one value like this because it's a grayscale value.
noiseMetal = fbm(vec2(40.0, 1000.) * p.xy);
vec2 coord = fract(vec2(1.0, -3.0) * p.xy + vec2(0.5));
vec4 mt = texture2D(metalText, coord);
float t = mix(0., grayscale(mt.rgb),mt.a * step(p.z, 0.) * step(p.x, -0.5) * step(abs(p.y), 0.16));
float swivelM = 2.2 + t;
s = opU(s, HIT(swivel, swivelM));
sticker emoji
For the sticker that appear on the swivel, we add to the distance a disc and we use a side effect vec3 sticker_color variable that is later used in the shade function. The position of the sticker is randomly placed.
${
  !opts.sticker
    ? ""
    : `
vec2 q = p.xy + vec2(${opts.stickerPosX.toFixed(2)}, ${opts.stickerPosY.toFixed(2)});
float sticker_size = 0.15;
float sticker_border = 0.01;
coord = fract(vec2(.5,-.5) * q / sticker_size - 0.5);
vec4 v = texture2D(stickerText, coord);
sticker_color = mix(vec3(1.), v.rgb, v.a);
float l = length(q.xy)-sticker_size;
s = opU(s, HIT(max(
  abs(p.z + 0.13)-0.005,
  l-sticker_border
), 4.2 - step(0.0, l)));
`
}